Pages

Showing posts with label shirt. Show all posts

Thursday

baby pajamas: take 2


So this is my second rendition of the "discarded top becomes baby jammies" thing I've been doing lately.  As I mentioned in the last post, this is my way of learning to sew with knits.  And I'm definitely learning as I go.  


For instance: I got lucky with this pair of tops - they were both from Old Navy, and matched quite well. Except that the striped shirt is a good deal thinner than the solid gray one.  I thought this wouldn't be an issue, but it became one.  Looking at the first pictures again, you'll notice the cuffs at the bottom of the pants.  (Apologies for the dirt all over them - it's a long story.  I have a kid.  That's the short story).  Those cuffs are made from the same material as the pajama top, you know, to be cute and matchy.  Well, they're so heavy they weigh down the rest of the pants, and end up sliding under Lila's feet when she walks and crawls.  Also, I should have made them smaller than I did, so they would fit snugly around her leg instead of drooping there.  It would have looked better too.  

I considered removing the cuffs altogether and doing another lettuce hem, but decided to wait and see if she grows into them instead.  Because, and this just proves how overly critical we are of our own sewing, I put the original store-bought pants on her, and guess what?  Same thing.  Not quite as bad with the drooping, but still, the pants are long on her and slide under her feet, something that never bothered me until I made her a pair myself.  So they'll be a little long for a while.  


Allow me to dissect the shirt next.  I once again used Rae's Flashback Skinny Tee pattern, with great results.  I spoke about this in the last post, gushing about how much I like the pattern.  However, I had a sort of problem with the neck.  I initially was going to finish the neck with ribbing to match the bottoms, but it just didn't work for me.  When I measured around the neck and subtracted an inch, as the pattern says, I came up with a crazy big number.  I remembered reading Gail's skinny tee post over on probably actually that mentioned a similar issue, so I headed over there to reread it.  Gail's recommendation?  Follow the suggested length included in the pattern, rather than using your own measurement.  Which I did.  When I held up the finished neck ribbing (before sewing it on the shirt, smart me!) it looked suspiciously small.  Tiny even.  I tracked down baby and tried to squish it over her great bobble head to no avail.  Lila was not amused.

Here's the thing.  Knits are stretchy.  Some just aren't as stretchy as you need them to be to finish the neck.  Now I don't actually know anything at all about knit fabrics - what's a jersey, anyway?  This is why I'm learning with old shirts, and why I picked out fabrics that had matchy colors without thinking about whether their weight and stretch would pair well together.  But now I know!  Knits are like cheese and wine people!  Cheese and wine.  Except your cheese probably isn't stretchy.  Or maybe it is.  Um, I don't actually know anything about pairing wines either.  Shoot.

My point is, even with the neck issues, I still love this pattern and happily recommend it.  Here's what I did - I hemmed the neck to match the bottom of the shirt.  Just flipped it under, pressed, and sewed in place.  It made for a very nice, roomy, breathable neck that's easy to pull over Lila's enormous noggin.  Oh I do love how the Flashback tee can be personalized in so many ways.  As another example, I cut the seam allowance on the sides of the shirt in half, giving the finished garment more width and room.  I'm wishing I'd given it a little extra length to match the extra long legs on the pajama bottoms so she could grow into both equally.  Next time.  


See the cuffs sliding under her feet?  


And you can see how perturbed she is by that, right?  

I do believe I shall be making more jammies in the future, so be on the lookout.  First though, I have a long overdue baby skirt tutorial to put up, and Lila's first birthday is coming, so you can expect good things related to that.  

Best Wishes!
Teresa

Wednesday

baby pajamas: take 1


Sometimes I sew just for fun.  Sometimes I sew because I see something that inspires me, and I have no choice but to watch it come to life in my craft room.  And then sometimes I sew because Lila is running out of pajamas that fit her, especially short sleeved roomy ones for the six months of heat that are coming up, and somehow the easily procured big-box store brands aren't going to be good enough.  Mm hmm.  As an added bonus excuse, I've been wanting to learn to sew with knits, and starting with baby pajamas seems like a low-stakes way to jump in.  

So, here's my first take.  There are more on the way.  I'm pretty happy with the results.  (Uhm, that weird discoloration all over the pants? That's what happens when you let your kid play in the wet grass before starting your photo shoot.  They're not that way all the time.  They look nice from the time I pull them from the dryer until 3 milliseconds after putting them on Lila.)  However, I think they could have been a little more matchy.  Maybe it's good that they're not though.  I could always use them as actual clothing pieces in a pinch, right?  

Because I'm just starting to learn knits, and because I'm too lazy to try and source good-looking knit fabric, which I hear is no easy thing to do, I used discarded tops I no longer wear.  Here are pics of what I started with:    


So I was initially going to do different pairings as you can see, but I realized at the last minute that I'd lost my maternity weight and still fit into the cute pink top which I loved before it got WAY too tight on me.  So it was a happy reunion, and Lila was outta luck.  Would have been cute with the orange, but instead the orange and white are now mated for life.  Anyway, the white top was a real challenge to work with because of the (if you look really close you can see it) little vent lines running up the sides, which I had to work around.  But I think the buttons turned out cute, and hey, I didn't have to sew them!

Okay, here they are on my model baby:


My, what a life-like baby mannequin I have!  She stands, she sits, she even goes poo!  Yes folks, she was a limited edition - only one ever made.  Can you believe my luck to have gotten her??  :)


Here's a closeup of the lettuce hem on the 3/4 length capris, so nice for Lila now that the hotter weather has arrived:


If you'd like to learn how to do a lettuce hem with your knits, there's a wonderful simple tutorial over at the Oliver and S blog you should check out.  It's how I learned, and it's soo easy to do.  I love the look, and it's great for pajamas.  

For the pajama pants, I felt confident enough to make my own pattern from a pair of pajama bottoms Lila already had that fit her well.  By fit her well I mean that they are still large enough that she'll be able to wear them right through the hot weather and into fall before she outgrows them.  Here's the sketch I did using those pants:


Notice I turned them inside out to get the most accurate copy.  You could easily do this with any simple pattern.  There were no side seams on these pants, and the front and back were mirror images except for the higher rise in back to make room for baby butts.  That made this super easy, since I could cut two of the pattern on the fold (the fold being the right side of the pattern in the pic above), and then just cut the front lower for a proper fit.  So I drew out the general shape on tracing paper.  Then I added extra length for the elastic casing and cut the bottoms slightly shorter to make them capris.  I cut out my fabric.  Finally, I cut the front at an angle to give the pants their shape and rise.  If you're wondering what I'm talking about here, hold up any pair of pants by the top of the sides, and notice the front is lower than the back.  This is to make room for your butt.    


However, I was not willing to try and manufacture a pattern for the top.  No sir.  Not that crazy.  Since the world expert in sewing with knits is, in my ravaged mind anyway, Rae, I went straight there.  Actually it's Rae's Kniterview Series that finally goaded me into trying out knits, so we have her to blame for all of this.  

Anyway, I happily purchased her $10 Flashback Skinny Tee, and I'm just tickled that I did.  Not only did I get a nice basic t-shirt pattern, but she also includes several different finishes for the neck and arm cuffs.  Since it's a long-sleeve pattern, you can cut the length of the arm anywhere you like, for any weather.  I was able to use the pattern easily to transform an adult woman's shirt with holes all down the sides and buttons down the front into a baby pajama top.  I mean seriously, that's a VERSATILE pattern right there.  Will be using it lots in the future.  Like I've already sewn another top with that pattern, which you shall see shortly.  Plus she includes lots of "hints" for success when sewing with knits during each step, so you can't go wrong.  She says the pattern is for someone who already has a little experience with knits, but I did just fine with basically no experience other than having sewn one pair of little knit pants.  But, I've read a lot of her tips elsewhere on sewing with knits.  However, I don't have any fancy equipment to work with - no serger, not even a walking foot.  And the top still turned out well, so I'd say it would work for any person who possesses other sewing experience and some preliminary information about sewing with knits.

Okay, here's some cuteness for you:


Ridiculous yet adorable, no?  I'm sort of in love with these labels a lady named Gail has been known to make.  I've stolen her idea.  I'm sure she wouldn't mind if you did too.  

Best Wishes,
Teresa

Sunday

baby jumper shrinks into a shirt


I made this little jumper with pockets for Lila last fall.  This is one of those projects where you have a very clear picture of what you want the final result to be, and you know you're going to have to either wing it completely or alter an existing pattern to get what you want.  I knew I wanted a burgundy corduroy jumper to dress Lila in for Thanksgiving, but I wanted it have some cute girly accents so it wasn't so "heavy" on the eyes.  So I went trudging through the internet to find a pattern to alter.  

What I found to work with was this free pattern and tutorial from LiEr over at Ikat Bag (her version to the left).  Because I was born with no memory (probably not my only birth defect...) I totally lied to my friend Melissa and told her that I made this with no pattern.  Whoops.  Sorry LiEr!!  At the time all I could remember was making the pattern for the pockets, and making homemade bias tape for the trims, and deciding at the last minute to add the little ribbon bows.  And I knew I used some of Lila's existing clothing to set the length, and to modify the width.  So somehow that all just swirled around in my head until it solidified into the thought "I made this from scratch".  Well thank goodness I've since remembered.  Now you can head on over to Ikat Bag and grab the pattern for yourself!  


Here's a closeup.  My lovely vintage (we're talking avocado green) sewing machine decided to go into semi-retirement during this project, and quit sewing any stitch other than a straight.  As a result, I hand-stitched those buttons and buttonholes.  A labor of love, and a good reminder of how easy and quick it is to do on the machine.  (I've since purchased a new sewing machine, which is loooveleeey, but I do miss my old Kenmore).  

The fabrics are all from JoAnn's, and except for the corduroy they're leftover scraps from other projects, so I have no idea who made them, or whether they're still available.  At the time I sewed this I wasn't thinking about blogging, and as I've mentioned, I have no memory.  But you can probably still find the corduroy there.  


As you may have guessed from the title of this post, she outgrew this jumper in an instant.  It then became a shirt, as you can see above.  And if you look closely you can also see evidence she's a messy little eater.  This thing's been through the washer over and over again.  But now that the weather is approaching the 90's around here, she probably won't wear it again, unless it somehow still fits her this fall (which I doubt).  

The pattern comes in two sizes: 2T and 3-4T.  As she was less than six months old when I first made the jumper, I cut the size down considerably.  I also changed the angle at which the sides flare out, so that the jumper turned out narrower at the bottom than the original pattern, since that's the look I was going for.  


Can you see the way it fits rather straight and snug, as opposed to flaring out?  


One of the nice things about this pattern is that it's simple, and calls out to be embellished.  The pattern doesn't include a piece for the pockets, so I just drew up a size and shape I liked, and added bias tape to the top.  Hey, if you're looking for a tutorial on sewing with bias tape, I just happen to have one here (flashes big smile).  I also added the bias tape trim to the bottom hem for a more finished and matchy look.


I don't remember what type of seam the pattern called for, or if it did, but I went with flat-felled seams along the sides.  I'm liking the look, and I think I'll start using it more often, especially since it's not that hard to do.   Also, if you're like me and don't want to invest in a serger, it makes for a nice fray-less finish.  It's also flat on the inside unlike french seams, which stick out a little.  I don't know why, but I'm always thinking about whether the clothes I make Lila will scratch or annoy her when she wears them.  She could probably care less, but still, isn't that one of the points of handmade?  All the nice details.


I chose these matching buttons by default, since they were really the only pair I had that would work on this jumper.  But I'm glad I did, since I think brightly colored ones would detract somehow from the pockets and trims and make the finished product too busy.


Do you think I should be feeding her more?  Well, she did go and outgrow that jumper, so I guess we're okay. :)  

Best Wishes,
Teresa

Tuesday

sweet little dress: pattern review


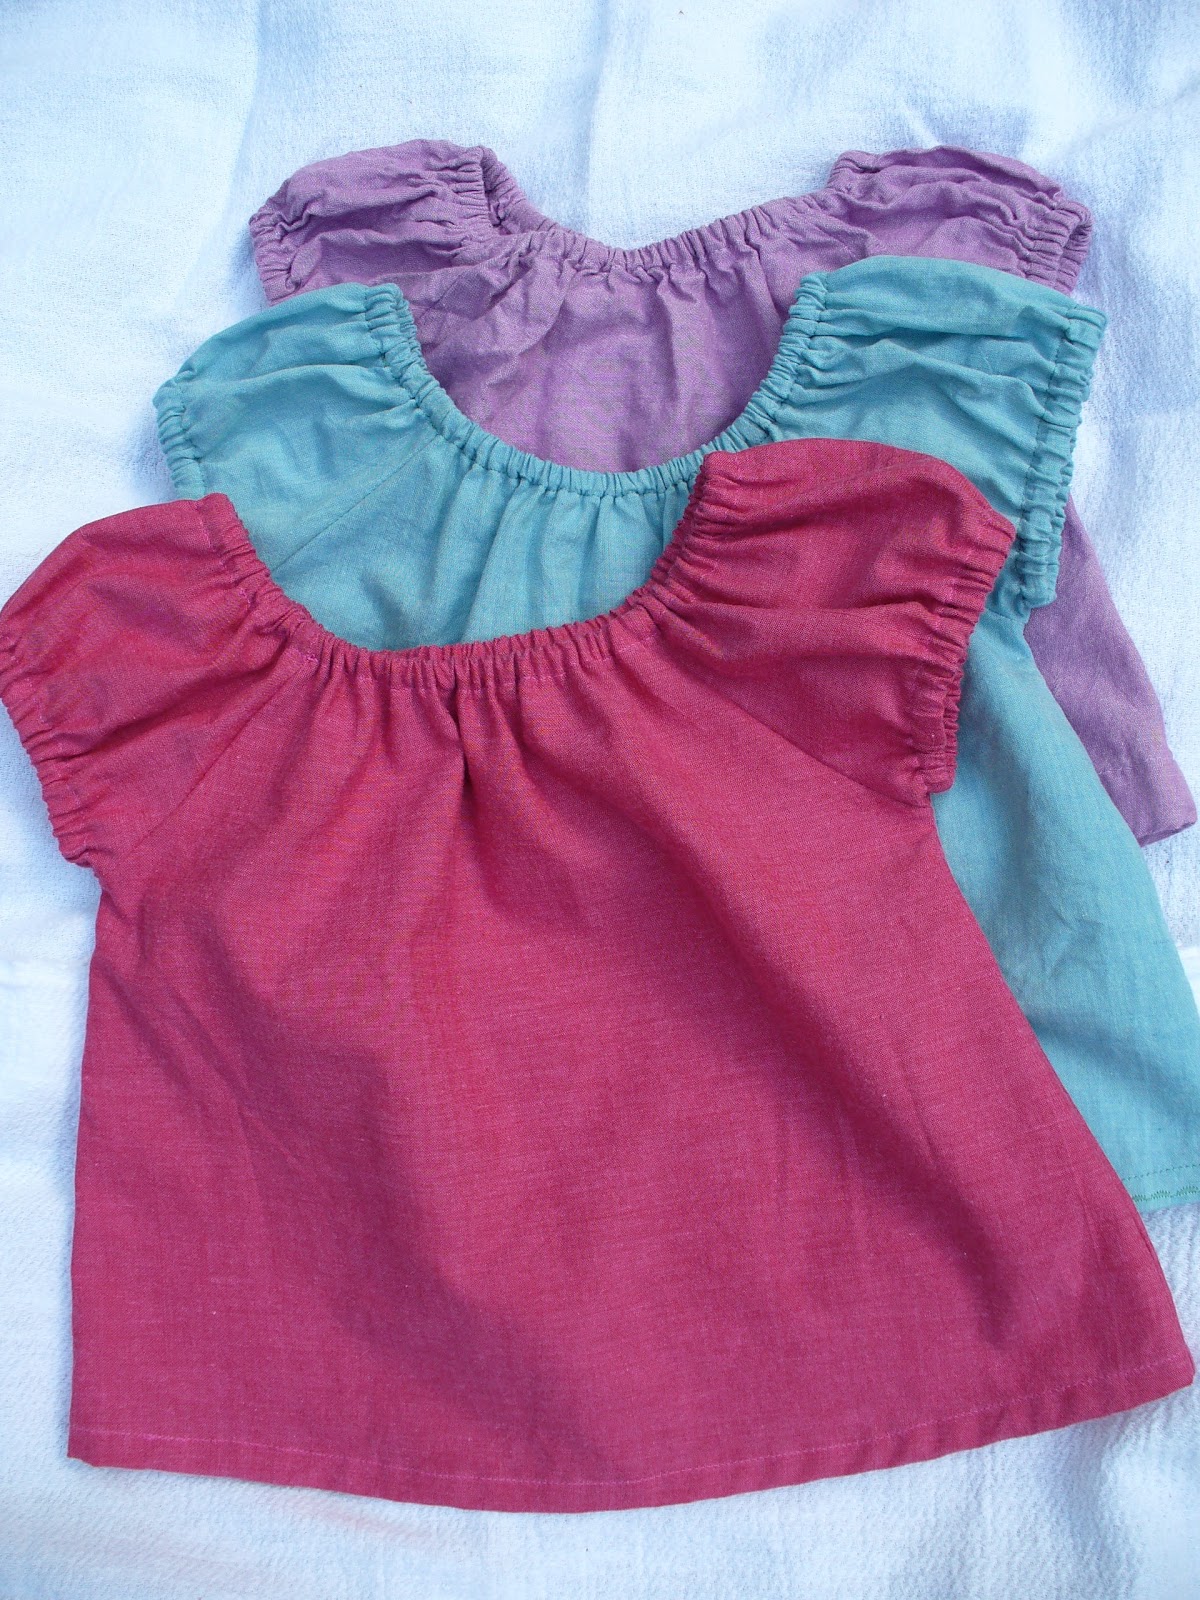
Sweet little dress, and sweet little pattern as well!  This is the "sweet little dress" pattern by Leila & Ben, priced at $6. (You can purchase the 12M to 5T pattern here.  They also have a pattern for babies under 12M and another for kids age 6 to 10 on their website, all of them downloadable PDF's). 


First let me say that I actually had fun making these.  Yes.  Fun.  Otherwise I wouldn't have hauled off and made three of 'em.  Once I'd finished the first one, the rest came together extremely fast - less than two hours apiece.  And for that investment of time, I'm very happy with the results. 

One day I will rule this Earth...
I think the simplicity of the solid fabric, shot cottons by Kaffe Fassett, pairs beautifully with the understated details of the pattern.  My sister, who has a baby girl the same age as my Lila, saw the picture above and immediately requested one for her Kira.  She actually told me she'd pay money for one.  Which of course I would never take, but I tell you, she was enthusiastic.  Well, I can't have poor Kira going all nakey, can I?  So I made her one too - the pink one.  It's in the mail and on the way as I'm writing this.  (Don't tell!)


These are sized for a 12 month old, larger than our nine month old babies, so there's room to grow.  I modified the pattern on all three to make them more of a short dress, which will later function as a regular shirt.  I thought the shorter length, cut above the knee, was cuter for a baby, and easier for them to crawl, scoot, and pull themselves up in.  The purple one is hemmed very short, so that it fits as a shirt for now.  However, if you look closely, you'll see the hem is set higher, and that's because I have another, hidden hem rolled up and pressed inside there.  So all I have to do when I want more length is undo the outer hem, wash, dry, and press the bottom, and it'll be all ready to go - no more sewing required.  Yay!

see the different hems?
And looking closely at the hem on the blue dress, you'll see that I've added embroidery along the bottom, just for an extra little something (and because I've been searching for an excuse to try that stitch on my sewing machine, truth be told).  

What I Learned:
First, the pattern cut-out.  I had to pay a lot of attention while cutting out the pattern, and do a lot of cutting and taping of different pieces which had printed across multiple pages to form the body pattern.  It was a little confusing there for a second, and took a bit of time.  Looking closely at the pattern, I think it may be more of an issue for the 12M size than the others.  But with a bit of patience it came together correctly in the end - no big deal.  


To modify the length, I traced the bottom hem onto a sheet of paper, cut it out to use as a template, and then placed it over the original pattern, moving it up and down until I was happy with the length.  Then I traced it onto the original, and cut.  This left me a shorter pattern, but the same slight curve along the bottom the original version had.  Make sense?  

When cutting out the fabric, I realized the sleeve pattern was a mirror image just like the body piece, and could be folded in half and placed along the fold of the fabric for cutting, just like you do for the body piece.  Since there are two sleeves per dress this saved me a bit of time, and after making three of these, it added up.  If you have a baby you know what I'm talking about here.  Craft time = nap time - (cleaning+laundry+errand+cooking time) = not a lot of time.  Along the same lines, I discovered that sewing all four of the sleeve seams first, and then going back and zigzag stitching to finish them, saved some time. (Rather than sewing one, switching over to zigzag, adjusting settings, trimming, and switching back again as the pattern instructs).  


And a final tip: be careful when sewing around that neck hem - if your fabric is anything like mine, it will want to unroll itself as you sew that curve, and chaos will ensue.  The seam ripper will pay you a visit.  And you know you don't want that.  So take your time, and make sure those seam allowances are well pressed before you start.  Luckily, the neck is all elasticized in the end, so minor mistakes won't show.  And you know your little darling is just going to puke up all over it anyway, right?


In the end, this was a simple, easy to follow, guaranteed success kind of a pattern.  And because it's basic, I could envision all kinds of sweet ways to make it your own - embroidery, applique, coordinating sleeve fabric, bias tape or rickrack for trim along the bottom, pockets, buttons, golly gee.  I'm starting to want to make another, just so I can try out something from that list.  If you'd like to see some very cute variations of this dress using patterned fabrics, corduroy, and in full length, check out this post from Maggie over at Smashed Peas and Carrots.  Since I have the basic pattern through 5T,  I know I'm going to get a ton of use from it.  So, final review: I'm really happy with this pattern.  

my cutie patootie, with Sukie on guard
See the above photo?  That's Lila, pointing to the end of my blog post.  As in, finish up Mom, and come play with me!  Yes ma'am.

Best wishes,
Teresa