Hi there! You're here because you want to learn how to sew bias tape without making a giant mess of things. And I'm here to show you how, using 4 simple steps and lots of photos so you don't get lost, and sharing all my little tips for success. In this tutorial you'll learn how to enclose the raw edge of your project with bias tape, how to start and finish sewing your bias tape, and how to get it to go around curves smoothly, even hairpin curves.
I've noticed there aren't many tutorials out there for doing curves, so I'm focusing on that here, and not corners. If you'd like to learn to sew bias tape around a corner, check out
this tutorial from Maggie over at
Smashed Peas and Carrots. And, if you're feeling like going all out and want to make your own bias tape, you'll want to
visit this tutorial from Dana at
Made. It's the absolute most thorough bias-tape making tutorial out there - she covers everything from what it is, to why it is, how to make it, how to use it, different types, oh my!
When I first started sewing with bias tape, I wanted to do it Right. I went looking all over the internet for the best method, and here's what I can tell you: there is no best method. There's only what works best for you. There are as many different ways to sew on bias tape as there are craft blogs on the internet. So this is not the one and only way to do it, it's just the method I've worked out for myself over the years.
Oh, by the way, I hate pins (because they hate me, which can be the only explanation for why they are always driving themselves up into my nail bed) so I avoid them whenever possible. Sometimes I'll use those little flexible metal barrettes (you can get them from the jewelry section in JoAnn's) to secure layers together while sewing, but that's it. So this is a pins-free bias tape tutorial. Yay for that! And, because I just happen to have magical color-changing bias tape, you'll see the tape in this tutorial change from red to pink and back again. Certainly it's not because I didn't take enough photos the first time around, and had to take more of the next bib I sewed in order to make a complete tutorial.
Here's a quick list of the 4 steps used in sewing on bias tape: 1) Orient your tape properly 2) Sew on 3) Trim and flip 4) Secure with final stitching
Before we get started, a note about bias tape - it's meant to be a little stretchy, so that you can tug and pull and get it to fit around curves. That's the whole point. It's what makes bias tape cool. However, you don't want to start a tug-of-war with your machine. Your machine will lose. Or your project will. So just be aware of the amount of force you're using, and relax a little if need be. Once you've done this a time or two, it will become natural and you won't have to think about it anymore. Another note - you'll want to use thread that matches the color of your bias tape as closely as possible. Trust me on that one.

Okay, so here we have what's called double-fold bias tape. Be careful to not accidentally buy single-fold bias tape - they look similar in their packaging at the store. Mine is 1/2 inch, though you can find it or make it in other widths if you wish. You'll want to pre-wash it if it's going onto something that will be laundered, like
the baby bibs I'll be making in this tutorial. And if you wash it be sure to iron it afterwards so that your creases are nice and crisp just like when they first came out of the packaging. Now you're ready to go!
Step #1: Orient Properly
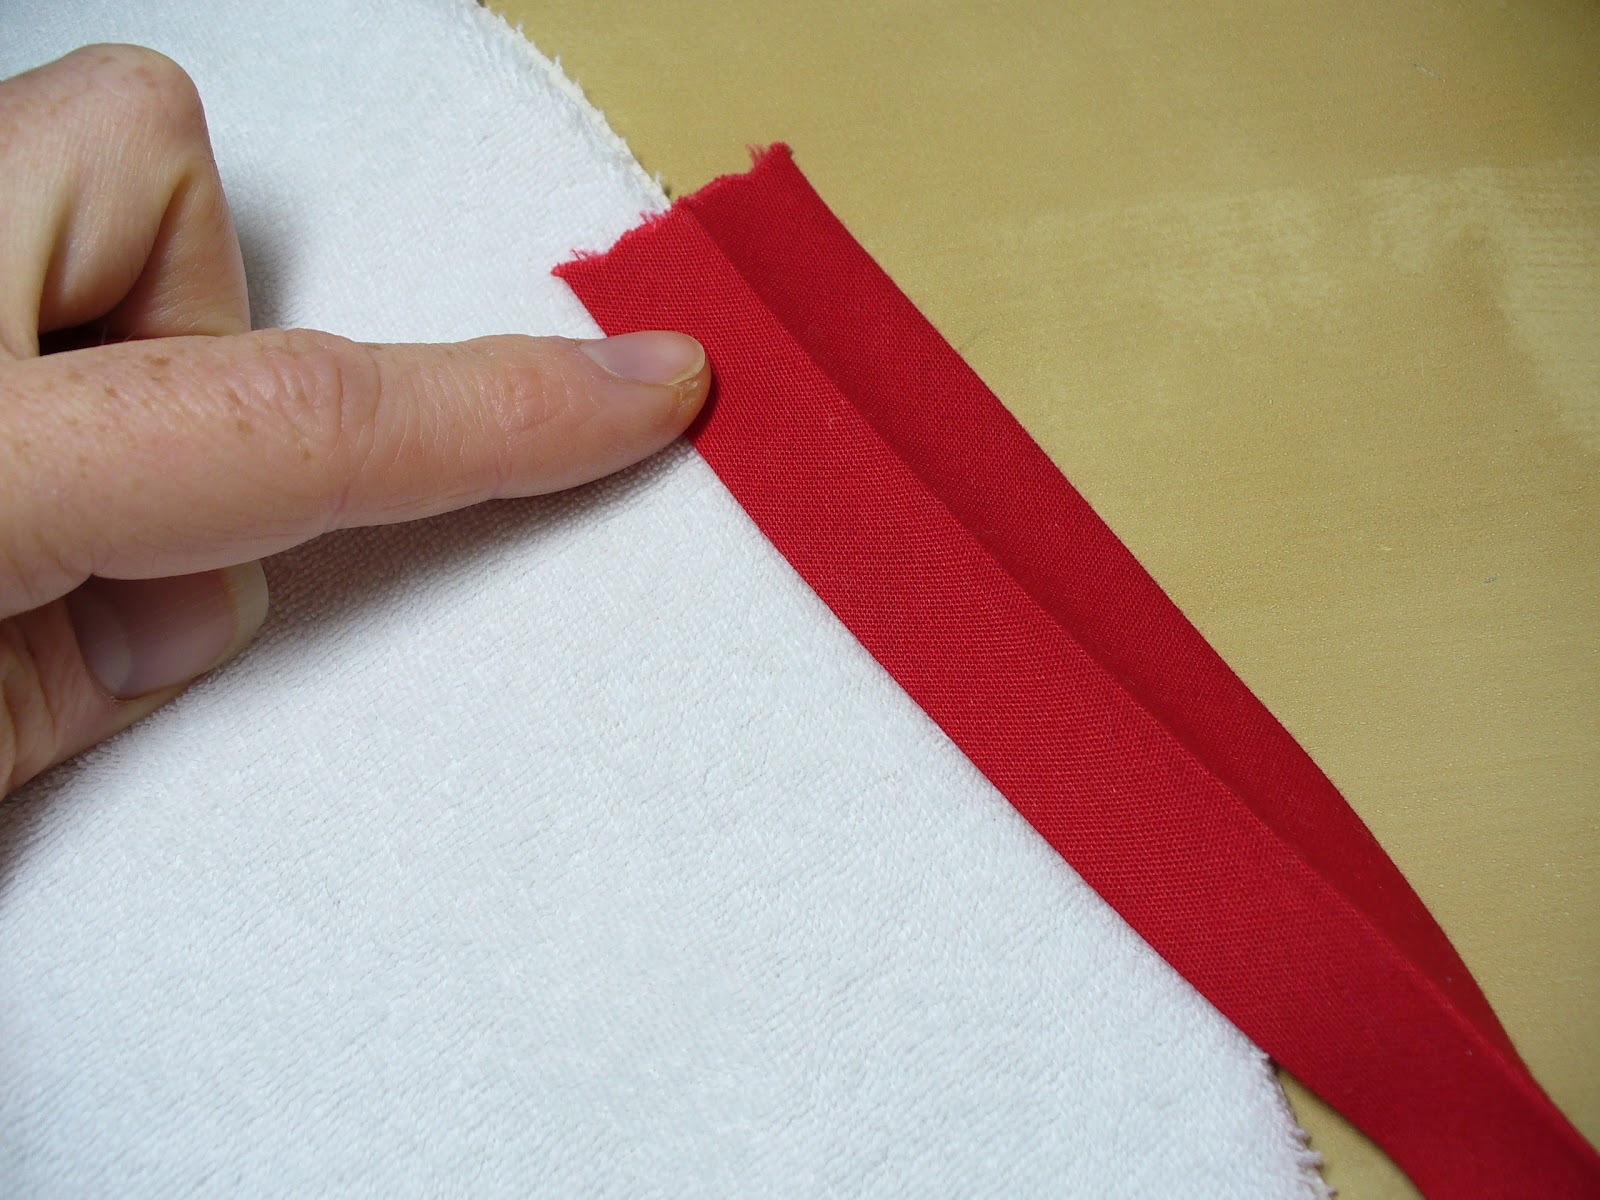
So looking closely at the photo above you'll see that one side is narrower than the other. The narrower side is the top side, and the wider side is the bottom. You want the bottom to be wider so you can be sure to catch it when you are sewing through from the top - this will make sense in a minute.
When you are first learning to work with bias tape it's helpful to get started by orienting it correctly onto your project, as you see in the photo above. Start with your project face up. See the narrower side of the bias tape laying over the top of the bib, and the wider underneath? If you start this way, when you unfold it in the next step you can't go wrong. (The terrycloth is the front of my project in all the photos below).
So the next step is to place your finger onto the start of your bias tape, and then pull out the wider side from underneath your project.
And then open up the bias tape the rest of the way, so that when you're done unfolding it, it's upside down. What was the outer side of the bias tape should be laying against the front of your project. It should also be aligned against the edge of your project. So, at this point you have your bias tape upside down with the narrow end against the edge of your project.
Okay, now flip over the end of your tape, about a 1/4 inch or so, as in the photo above. And you're all ready to sew!
Step #2: Sew!
You want to sew right inside that first crease, starting from the beginning of your bias tape, as shown above. And just follow along that crease, using your fingers to adjust your bias tape, and keep it lined up on the edge of your project as you sew along. See how I'm not using pins? I'm a rule breaker. And I find that using my hands to align the tape is easier and faster. I've found that the end results look better too. But if you and pins work well together, than by all means, do so. Whatever works best for you.

Here you are, approaching your first curve and beginning to panic inside. No need. Just fold your bias tape along the inside edge so that you have a couple small creases, like you see above. This will cause the outer edge of your bias tape to curve nicely along the outer edge of your project. But, and this is important, DO NOT let those folds intrude past the first crease, the one you are sewing along. Doing so will mean that you are sewing creases permanently into your project. If it doesn't make sense now, it will later. For now just do your best to not sew over any folds. Readjust your bias tape once or twice as you are sewing along the curve if needed.

In the picture above, I'm sewing the tape around one of those hairpin bends in my baby bib. And not only that, but there's a piece of velcro layered in there as well. Here's how you can get decent results under these circumstances: Take Your Time. Sew three stitches, leave your needle in the down position, lift presser foot, turn project slightly, adjust bias tape slightly, lower presser foot, sew another three stitches. If you try to go too quickly, you will inevitably sew creases into your project. This is because on a very tight curve you can't help but have those little folds protrude past your sewing line as you are adjusting your bias tape (see above). As long as you go slowly, you should be able to keep the area just in front of your presser foot free of folds, as you see in the picture above. And as long as you can do that, you should be okay.
I find that around tight curves, it really is best to forgo pins. You'll drive yourself nuts trying to get it all pinned down correctly, and the truth is that you need to be able to tug and pull and readjust here and there, and pins will get in your way. As a final reminder, remember to keep the outer edge of your bias tape aligned with the outer edge of your project as best you can. You probably won't be able to keep it perfect all the way around, but as long as the area just in front of your presser foot is correctly aligned, all will be well. And here in a bit, I'll show you a couple of techniques for minimizing any errors you do make. And you will make them (everyone does, even the best among us) so don't be hyper-critical of yourself.

Okay, I wanted to show a picture of what will happen when you sew around an inner curve, like along the neckline of a bib. The project will want to rise up into the air on you. Go ahead and let it. It's the bias tape curling to meet the curve ahead, and it won't affect the look or flatness of the end result.
So you've made it around all those curves and you're nearing the starting point. Leaving the needle and presser foot in the down position to secure your project, grab a pair of scissors and cut your bias tape to about a 1/4 to 1/2 inch past the original fold, as you see in the picture above. You want to do this so that your layers are staggered, to help reduce bulk. And then finish sewing down your bias tape to the end. Backstitch to secure.
Step #3: Trim and Flip
Now flip around to the backside of your project. See the back of my bib above? See how the seam allowance ended up wider along one side? We want to fix that.
Measure out how wide you want your allowance to be (3/8 inch in my case), and trim to that width all the way around, being careful not to cut into the bias tape you've just sewn down. What you are trying to do here is make sure that when you wrap your bias tape around to the back of your project, it won't end up wider in some areas and narrower in others. If some parts of your bias tape are too narrow, you won't catch them when you do the final sewing. If this isn't clear, hang on, it will be soon.

Okay, now that your allowance is evenly trimmed all the way around, go ahead and flip your tape to the backside, so that it wraps around the raw edge of your project. Above you can see me doing this at the start point of the tape, and you can see how the tape is staggered at the seam. When you are done, you want to make sure that the raw edge of your bias tape on the backside is folded in. In essence, it should look just like it did when you were orienting it properly in the beginning, only now you've sewn it down on the inside of the front.
This is what the back may look like where your layers overlap. We want to fix that. Tuck those raw edges under if they are sticking up.
Like so. And now go ahead and bust out a barrette, or a pin if you wish, to keep this seam secure until the next step. Or press it flat. Or just hold it tight. Whatever works for you. (As a side note, there's a way to sew this seam so that it ends up at a 45 degree angle, rather than vertical like you see above. The ladies at
Prudent Baby will
teach you how if you like. I like the vertical seam just fine, so that's what I do).
Ready for the final step?
Step #4: Stitch to Secure
Starting at the seam you just flipped over (which you can't see because it's under my presser foot), stitch in the ditch all around your project, backstitching at the beginning and end to secure. If you feel like it, and before you get started sewing, pin the bias tape all along the backside. Otherwise, just use your hands to snug up the bias tape as you go along. The point of all this snugging is to make sure you have a nice wide swath of bias tape on the backside to catch with your needle. Take your time and snug often, since your stitching will show on the backside when you're done.
Stitching in the ditch, in case you don't know, means to sew right inside the groove, or ditch, where two fabrics meet, in this case terrycloth and bias tape. Do you see where the needle is going in the picture above? If you're unfamiliar with this, it may seem impossible to follow that line all around your project, but I assure you it can be done. Take your time if you're feeling nervous.
Remember from Step #1 how the back side of your bias tape is wider than the front side?
That's so that you can catch it when you stitch in the ditch. See? Even though you stitched an invisible line on the front of your project, you still caught the bias tape on the back.
And here's a view of the back of my bib. Can you see that the stitching is not quite evenly spaced from the edge all the way around the entire bib? That's perfectly acceptable to me. The main thing is that the bias tape is lying flat all the way around, and I caught the tape when I stitched in the ditch.
And here's the front. Nice flat bias tape, smooth all the way around.
Wow. You can't ask for more than that from bias tape. That's a pretty sharp bend my friends, and the bias tape streched up to the job. Te he. Silly word play. Oh how I do amuse myself. Ahem. Anyways, bringing the bib under the microscope you will see that when I stitched in the ditch I overshot slightly when coming around the curve, and so you can see a few of my stitches in the bias tape. If that happens to you, don't worry, it really isn't going to be noticeable. That's why we use matching thread people.
The other flap of my bib. Not quite as flat as the first, but still pretty nice looking. Perfectly acceptable I say.
If you find that there are places along the back of your project where you didn't quite catch the bias tape (and it does happen), then go ahead and go back over that section again. Be sure to snug the tape around the backside nice and tight, and then flip back to the front of your project. Beginning before your missed section, stitch slightly into the bias tape, like you see above. Continue slightly past the missed section to be sure it's good and secure. Chances are no one will ever know. Unless you tell them in your online tutorial.
And that's it! Now you have all the steps and tips you need to sew like a bias tape pro. Although it might seem like a lot of work, it really isn't after you've done it once or twice. You're going to love the look, and you'll find yourself making any excuse to add bias tape to a project.
I really would love to hear if this helped you out. If you have any questions about the tutorial, chances are others do too, so go ahead and ask right in the comments section. I'd also love to hear if you have tips of your own that you'd like to share.
Happy Sewing!
Teresa