Pages

Friday

Free Pattern: Cutie Patootie Baby Skirt!


Howdy Ho!  I'm pleased to present to you the super-adorable and totally free Cutie Patootie Baby Skirt pattern!  Oh I do hope you love it as much as I do.  It comes in two main versions - pleated and gathered, and you can make yours either with or without pockets.  Plus, the pockets can be finished in any creative way you might like!  If you make one, please pretty please send me a picture or link so I might see it too!  I'd love to see what you come up with.

Okay, so Here's the Link to a two page printable version of the pattern (without pics).  Or you can just scroll down and read as you go.  If you'd like more information on the fabrics you see or how I came around to making the pattern, check out this blog post.  If you're looking for a good starter tutorial on the various many ways you can choose to finish your seams, go to this post from Sew Mama Sew!

Happy Sewing!  -Teresa


Cutie Patootie Baby Skirt

Ingredients:
1/4 yard of 45’’ wide fabric or 1/2 yard of any fabric 44’’ or less in width
Four 3.5” squares of coordinating fabric for pockets (optional)
Six inches of 3/4" elastic (or five and a half inches for the 12-18M skirt)
Matching thread
Fabric marking pen (washable), chalk, or a graphite pencil (for pleated skirt only)
Basic sewing equipment

Fit:
I’ve sized this pattern so baby gets the maximum use from your handmade garment.  For the most accurate fit, please measure the child’s waist when possible.  The skirt’s waist measures 18”, and this should fit sizes 18M to 2T or more, depending on baby.  For the 12-18M skirt, use 5.5” of elastic rather than 6 (make sure it will stretch out to 11.5” before using).  This will give a final skirt measurement of 17.5".  

Skill Level:
This is an advanced beginner/intermediate pattern.  It assumes you have a basic knowledge of sewing terms and techniques, and that you’ve successfully completed several projects in the past.  This pattern should take approximately two to four hours to complete depending on skill level, seam finish chosen, and whether you include pockets.

Notes: All seams are 1/2" unless otherwise specified.  This pattern uses three main pieces – the front, back, and bottom.  The front and back are combined in step 4 to become the top, and in the final step the top and bottom are joined to become the completed skirt.

On to the Instructions!

1.    Cut your fabric pieces.  You’ll need two 12’’ x 7’’ pieces, plus either one 45’’ x 5’’ piece or two 23” x 5” pieces (if your fabric width is less than 45”).  


For the pockets (optional), cut four 3.5" squares.  Take one of your four squares and cut into a U shape by pressing in half and, using a cup or other small round object, trace along one corner of the fabric to make a rounded shape, then cut.  Open, press, and use as a template for the other three pieces. (You may leave pockets square if desired, or cut into hearts, etc.).


If your fabric is less than 45” wide, complete the following step before moving on.  With right sides facing, sew your two 23” pieces together along one of the short sides with a 1/2" seam allowance, and finish seam as desired.  This should make one 45” wide piece.

I went with an inside-out flat-felled seam for a clean look - and because it's so easy.  You can choose to finish your seams as you wish.
2.    Press casings.  Take one of your 12”x7” pieces and fold the top (long) side over 1”, press, fold again and press. Repeat with other 12” x 7” piece. 

There are two folds there, I promise.

 3.    Sew pockets (optional).  With right sides facing, sew two of the pocket pieces together along the “U”, leaving top open.  Trim seam to 1/4”, clip curves, turn inside out, and press.  Tuck top inside by 1/2", press, and topstitch to secure.  (Alternately, fold top to outside 1/4", press, fold another 1/4", and topstich a narrow rectangle to get the look you see in the pockets below.  Or finish normally, then add lace, ribbon, buttons, etc.)  Repeat for other pocket.


Pin pockets onto one of your 12” x 7” pieces, centering two inches from each other, and one inch above the raw (unpressed) edge.  Using a 1/4” seam allowance, topstitch around the “U”, backstitching at beginning and end to reinforce.  This is now your “front”. 


The completed front piece.  Why do my pictures always look so wonky?  It's like I live in a funhouse or something....

 4.    Combine front and back.  On both front and back pieces, open the folds you pressed in, and with right sides facing, match the front and back together, aligning the creases of the folds.  Sew together along both of the short sides, creating a tube of fabric.  Finish seams as desired.  This is now your “top”. 

The completed top piece.

5.    Sew elastic.  Orient the top so that the wrong side of the back is facing you.  Take one end of the elastic and place it between the two casing folds you pressed in earlier, aligning it against the seam to your left.  Pin in place.  Stitch along the end of elastic close to the seam, backstitching at beginning and end.  

Hard to see those casing folds, but they're there.

Repeat with the other end of elastic, so that it’s secured just inside the other seam.  Your fabric should be bunched up behind the elastic at this point. 


6.    Finish top edge of skirt.  Fold top crease over along entire waist, pulling elastic taut as you fold (use presser foot to assist in holding one end).  Pin elastic in several places. 

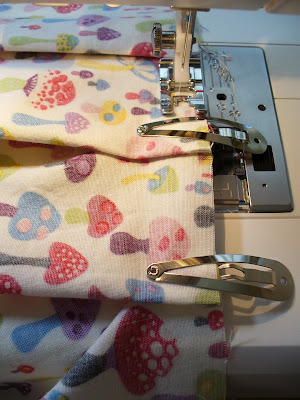
If you hate pins, as I do, you can use barrettes for this step.  Also, notice I'm using the presser foot to assist me.

Pull elastic taut and fold again.  (Is it just me or does the word "taut" sound naughty?)


Starting first along the elasticized back, sew down the casing 1/8” in from the bottom of the fold, making sure fabric is smooth and flat as you go.  Stretch the elastic taut (he he) a few inches ahead of your needle (while holding from behind to secure), adjusting as you go.  Try not to sew into the elastic. 

Hold your fabric from behind the presser foot to stabilize as you sew - I wanted to show this in the pic, but I don't have three hands.  

The top of your skirt is now complete.

All that finagling with elastic means you have a lovely clean seam inside.  

And a smooth flat front outside.
 7.    Make your marks.  (Skip this step if you are making the gathered version). Take your bottom skirt piece (45” x 5”) and with the wrong side facing you, mark your folds along the top, or long end, of your fabric.  Make your first mark 1/2" in, then every 2 inches to the end.  Your last mark should be 1/2” from the end of your fabric, with a total of 23 marks.  (The 1/2" ends are reserved for your seam allowance). 


It's hard to see my marks.  I added pink squares to guide your eyes.  You're welcome.  If you're thinking that I just couldn't figure out how to get the pointy finger or cool arrow onto my picture, well, um, you're right.  Sigh.  

 8.    Make your pleats/gathers.  For pleats: using your marks as a guide, fold your pleats, and secure with pins.  Begin with your second mark; lift and pull the fabric so that it meets the third mark, tucking the excess fabric under and to the left, and smoothing flat.  Pin to secure.  Repeat to the end.  


With a 3/8” seam allowance, sew along the top edge to secure the pleats in place, being sure to keep fabric flat and smooth as you go. 


For gathers: baste along the top edge of fabric, 1/4" from edge, and leave several inches of thread hanging from both ends of stitching.  Repeat 3/8” from edge.  Pull both of the bobbin (bottom) threads gently to gather fabric, pushing fabric along threads to even out.  Leave 1/2” smooth on either end for the seam allowance.  When the gathered length, including seam allowances, measures 24”, tie off and knot your threads several times.

This is where a picture should be.  I totally dropped the ball, because I didn't think to get a picture of this when I sewed the orange skirt.  I'm still a learnin' how to do this tutorial thing.  Hopefully the written directions are clear enough.  If not, let me know in the comments, and I'll see if I can clear things up.

9.    Finish bottom piece.  Match short ends (sides) of the bottom piece together, right sides facing, and sew together, creating a tube.  Finish seam as desired. 


Take the raw (unpleated/ungathered) edge of the bottom piece and fold under 1/2”, press, fold another 1/2" and press again.  Stitch 1/8” inside fold to secure hem.


10.   Join top and bottom.  Turn bottom piece inside out, and place top inside it with right sides facing and raw edges and side seams aligned.  (One tube should now be inside the other, the one with pleats/gathers on the outside and visible to you).  


Sew together, being sure to keep previous line of stitching inside the seam allowance.  Backstitch to secure.  


Finish seam as desired. 


Congratulations - you’ve completed your Cutie Patootie Baby Skirt!  Time to crow/complain about it in the comments section!


Saturday

baby skirts!


I have a confession to make.  Um, I live in my pajamas.  Seriously.  I'm in them right now, and it's after noon.  After I shower, I just put on another clean pair of pj's, unless I'm going out.  And by out I don't mean to the yard or the mailbox, or the neighbor's house to let the dogs outside during the day.  I mean I'm getting in the car and heading somewhere.  There's no exception to this, except major holidays like Christmas and Easter, and not even always then.  I've been living this way for years now.  It's awesome.  

I pretty much don't dress Lila in "street clothes" either, unless we're going out.  But now that I've made a few of these skirts, I find myself actually wanting to put daytime clothing on the child.  During the day.  Even if we're not going out.  Yes!  That's how infatuated I am with these cuties.  My original "inspiration" skirt was a sweet find at a thrift store, before she was even born.  You can see her wearing it below - and OMG, I'm wearing street clothes, and I'm not in town!  It must be Easter.  Yes, that's from my Easter post.  Okay then.


So I liked that skirt so much that I made a sort of copycat, which you can see (not very well) in the photo below.  It's the only, and therefore the best, pic I have of her in it.  Sewing that skirt was a learning process for me, and it didn't turn out quite like I'd wanted.  But it's still cute on the girl.


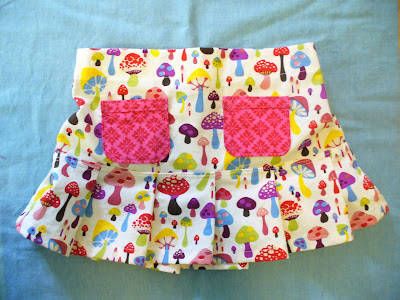
And I've since made the two skirts you saw at the beginning of this post, one with gathers (which I adore) and one with pleats.  And just how cute is that mushroom fabric?  Too, that's how.  It's called "willow shroom" and it's by the Alexander Henry Fabrics Collection, 2009.  I think I picked it up at the Atlanta Sewing and Quilt Expo this spring.  As long as we're on the subject, the orange skirt is shot cotton by Kaffe Fassett.  Pictures cannot do it justice.  It's just so beautiful, soft, lightweight, and the colors!  Oh my.  You've seen me feature his shot cottons before, and you'll see them again, I'm sure.

Since my good friend Melissa requested that I make a tutorial for this skirt, well, I up and did!  Originally I was going to just do the pleated version, but then I made a gathered one for giggles, and liked it even more.  So you get both.  But you're gonna have to wait.  Not too long.  I've completed most of the tutorial, and I just need to find the time to put it all together with pictures and whatnot.  I expect to have it up sometime next week, with plenty of warm summer weather left.  Though I'm totally using the shroom skirt this fall and winter.  I'll just pair it with leggings.

The skirt will also come in two sizes - 12-18M and 2-3T, and can be made with or without pockets.  Plus the pockets can be square, U shaped, or whatever your heart desires.  So lot's of possibilities.  Okay, on to the action shots:


It was so hard to get pictures with the pockets showing.  So hard.  I mean this child just WILL NOT take direction.  Can you believe it?  It's like she has her own agenda or something.  Play, play play, all day long.  


Girl's looking a little wild in these pics.  I think because she needs her bangs trimmed.  I've done that once already, and she's not even a year old yet.  Do you know what I used?  Dog hair trimmers from Petsmart.  Bought them just for her.  They're perfect for the job.  What does that have to do with skirts?  Nothing. 

So be on the lookout for the tutorial!  I'm kinda excited about it, because I really am in love with the look of these skirts, and so wish to see them populate the Earth.

Best Wishes,
Teresa

Thursday

baby pajamas: take 2


So this is my second rendition of the "discarded top becomes baby jammies" thing I've been doing lately.  As I mentioned in the last post, this is my way of learning to sew with knits.  And I'm definitely learning as I go.  


For instance: I got lucky with this pair of tops - they were both from Old Navy, and matched quite well. Except that the striped shirt is a good deal thinner than the solid gray one.  I thought this wouldn't be an issue, but it became one.  Looking at the first pictures again, you'll notice the cuffs at the bottom of the pants.  (Apologies for the dirt all over them - it's a long story.  I have a kid.  That's the short story).  Those cuffs are made from the same material as the pajama top, you know, to be cute and matchy.  Well, they're so heavy they weigh down the rest of the pants, and end up sliding under Lila's feet when she walks and crawls.  Also, I should have made them smaller than I did, so they would fit snugly around her leg instead of drooping there.  It would have looked better too.  

I considered removing the cuffs altogether and doing another lettuce hem, but decided to wait and see if she grows into them instead.  Because, and this just proves how overly critical we are of our own sewing, I put the original store-bought pants on her, and guess what?  Same thing.  Not quite as bad with the drooping, but still, the pants are long on her and slide under her feet, something that never bothered me until I made her a pair myself.  So they'll be a little long for a while.  


Allow me to dissect the shirt next.  I once again used Rae's Flashback Skinny Tee pattern, with great results.  I spoke about this in the last post, gushing about how much I like the pattern.  However, I had a sort of problem with the neck.  I initially was going to finish the neck with ribbing to match the bottoms, but it just didn't work for me.  When I measured around the neck and subtracted an inch, as the pattern says, I came up with a crazy big number.  I remembered reading Gail's skinny tee post over on probably actually that mentioned a similar issue, so I headed over there to reread it.  Gail's recommendation?  Follow the suggested length included in the pattern, rather than using your own measurement.  Which I did.  When I held up the finished neck ribbing (before sewing it on the shirt, smart me!) it looked suspiciously small.  Tiny even.  I tracked down baby and tried to squish it over her great bobble head to no avail.  Lila was not amused.

Here's the thing.  Knits are stretchy.  Some just aren't as stretchy as you need them to be to finish the neck.  Now I don't actually know anything at all about knit fabrics - what's a jersey, anyway?  This is why I'm learning with old shirts, and why I picked out fabrics that had matchy colors without thinking about whether their weight and stretch would pair well together.  But now I know!  Knits are like cheese and wine people!  Cheese and wine.  Except your cheese probably isn't stretchy.  Or maybe it is.  Um, I don't actually know anything about pairing wines either.  Shoot.

My point is, even with the neck issues, I still love this pattern and happily recommend it.  Here's what I did - I hemmed the neck to match the bottom of the shirt.  Just flipped it under, pressed, and sewed in place.  It made for a very nice, roomy, breathable neck that's easy to pull over Lila's enormous noggin.  Oh I do love how the Flashback tee can be personalized in so many ways.  As another example, I cut the seam allowance on the sides of the shirt in half, giving the finished garment more width and room.  I'm wishing I'd given it a little extra length to match the extra long legs on the pajama bottoms so she could grow into both equally.  Next time.  


See the cuffs sliding under her feet?  


And you can see how perturbed she is by that, right?  

I do believe I shall be making more jammies in the future, so be on the lookout.  First though, I have a long overdue baby skirt tutorial to put up, and Lila's first birthday is coming, so you can expect good things related to that.  

Best Wishes!
Teresa

Wednesday

baby pajamas: take 1


Sometimes I sew just for fun.  Sometimes I sew because I see something that inspires me, and I have no choice but to watch it come to life in my craft room.  And then sometimes I sew because Lila is running out of pajamas that fit her, especially short sleeved roomy ones for the six months of heat that are coming up, and somehow the easily procured big-box store brands aren't going to be good enough.  Mm hmm.  As an added bonus excuse, I've been wanting to learn to sew with knits, and starting with baby pajamas seems like a low-stakes way to jump in.  

So, here's my first take.  There are more on the way.  I'm pretty happy with the results.  (Uhm, that weird discoloration all over the pants? That's what happens when you let your kid play in the wet grass before starting your photo shoot.  They're not that way all the time.  They look nice from the time I pull them from the dryer until 3 milliseconds after putting them on Lila.)  However, I think they could have been a little more matchy.  Maybe it's good that they're not though.  I could always use them as actual clothing pieces in a pinch, right?  

Because I'm just starting to learn knits, and because I'm too lazy to try and source good-looking knit fabric, which I hear is no easy thing to do, I used discarded tops I no longer wear.  Here are pics of what I started with:    


So I was initially going to do different pairings as you can see, but I realized at the last minute that I'd lost my maternity weight and still fit into the cute pink top which I loved before it got WAY too tight on me.  So it was a happy reunion, and Lila was outta luck.  Would have been cute with the orange, but instead the orange and white are now mated for life.  Anyway, the white top was a real challenge to work with because of the (if you look really close you can see it) little vent lines running up the sides, which I had to work around.  But I think the buttons turned out cute, and hey, I didn't have to sew them!

Okay, here they are on my model baby:


My, what a life-like baby mannequin I have!  She stands, she sits, she even goes poo!  Yes folks, she was a limited edition - only one ever made.  Can you believe my luck to have gotten her??  :)


Here's a closeup of the lettuce hem on the 3/4 length capris, so nice for Lila now that the hotter weather has arrived:


If you'd like to learn how to do a lettuce hem with your knits, there's a wonderful simple tutorial over at the Oliver and S blog you should check out.  It's how I learned, and it's soo easy to do.  I love the look, and it's great for pajamas.  

For the pajama pants, I felt confident enough to make my own pattern from a pair of pajama bottoms Lila already had that fit her well.  By fit her well I mean that they are still large enough that she'll be able to wear them right through the hot weather and into fall before she outgrows them.  Here's the sketch I did using those pants:


Notice I turned them inside out to get the most accurate copy.  You could easily do this with any simple pattern.  There were no side seams on these pants, and the front and back were mirror images except for the higher rise in back to make room for baby butts.  That made this super easy, since I could cut two of the pattern on the fold (the fold being the right side of the pattern in the pic above), and then just cut the front lower for a proper fit.  So I drew out the general shape on tracing paper.  Then I added extra length for the elastic casing and cut the bottoms slightly shorter to make them capris.  I cut out my fabric.  Finally, I cut the front at an angle to give the pants their shape and rise.  If you're wondering what I'm talking about here, hold up any pair of pants by the top of the sides, and notice the front is lower than the back.  This is to make room for your butt.    


However, I was not willing to try and manufacture a pattern for the top.  No sir.  Not that crazy.  Since the world expert in sewing with knits is, in my ravaged mind anyway, Rae, I went straight there.  Actually it's Rae's Kniterview Series that finally goaded me into trying out knits, so we have her to blame for all of this.  

Anyway, I happily purchased her $10 Flashback Skinny Tee, and I'm just tickled that I did.  Not only did I get a nice basic t-shirt pattern, but she also includes several different finishes for the neck and arm cuffs.  Since it's a long-sleeve pattern, you can cut the length of the arm anywhere you like, for any weather.  I was able to use the pattern easily to transform an adult woman's shirt with holes all down the sides and buttons down the front into a baby pajama top.  I mean seriously, that's a VERSATILE pattern right there.  Will be using it lots in the future.  Like I've already sewn another top with that pattern, which you shall see shortly.  Plus she includes lots of "hints" for success when sewing with knits during each step, so you can't go wrong.  She says the pattern is for someone who already has a little experience with knits, but I did just fine with basically no experience other than having sewn one pair of little knit pants.  But, I've read a lot of her tips elsewhere on sewing with knits.  However, I don't have any fancy equipment to work with - no serger, not even a walking foot.  And the top still turned out well, so I'd say it would work for any person who possesses other sewing experience and some preliminary information about sewing with knits.

Okay, here's some cuteness for you:


Ridiculous yet adorable, no?  I'm sort of in love with these labels a lady named Gail has been known to make.  I've stolen her idea.  I'm sure she wouldn't mind if you did too.  

Best Wishes,
Teresa